I am so out of the habit of writing it has become quite a challenge. Example is this post, started this back in March. I find that fact so sad and need to figure out ways to “just do it”
Now it’s just doing it
I said, I would show some of the stuff that I have been working on the past couple of months, at least. I thought I would start with sewing, these are the ones I have been working on. Have a little quilting, an apron, something that I used fabric to make, a basket, but I did not sew that one on the machine.
I had attached some binding to a quilt that my stepmother had started, and I finished.
Then there was some receiving blankets that I had started. Oh my gosh, I would have to say at least five years ago maybe longer.
So let me start off I will start off with the oldest and that is the receiving blankets. They’re made out of flannel, of course. It’s not necessarily though, you could make them out of cotton or that gauze that was popular. I made mine out of flannel because I had a lot of leftover flannel from working on the boys stuff.
I use the self binding method by Missouri star quilt. They turned out adorable. When I had started them way back when, I had cut out more than just these two that I am showing here. My goal is to get to get around to those also and then donate them to some sort of women’s shelter or one that deals with just single mothers.
.
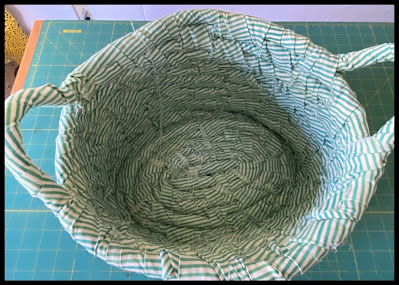
Then oh, I’ll take that back there the basket which is supposed to be a bag but I didn’t have the handle so it ended up just being a basket. I decided to just finished it off that way. That is actually the oldest project that I finished. I had purchased the stuff to make that bag when the boys were born back in 2012. I wanted something to work on seeing how they were still at the still at the hospital. Being that they were preemies they ended up being there an additional three weeks. So when I came back home, I never did pick it back up. I had it packed away and totally forgot about it till now.
As you can see, it’s not a bag. It’s more like a bucket basket. It’ll go good well in my studio and I will throw some yarn in it or maybe fat quarters. I haven’t decided how I’m going to use it in there.
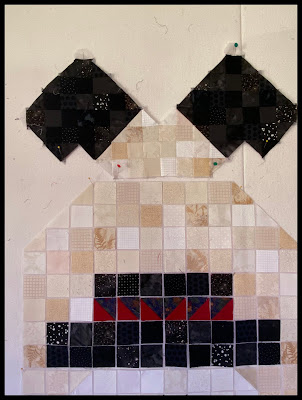
The next old one is this project, the tumbling skating Snowman. It is a pattern put out by HappyHollow designs.
They have it marked as a table runner and I suppose you could put it on your table but I think the way it’s shown it’s a wall hanging. That is how I will use it. It has been up on the wall for 5 months now I just have not had my sewing mojo on. It’s been a challenge at times to concentrate after treatment so needless to say, I would do easy projects not that this project is hard it just needed some focus on my part and most of the time I just didn’t have it . But I can say now I do and I’m so happy.
I have all the scrap squares ironed on to the fusible back
and as you can see in the picture I have the top third piece all sewn together. I’m really liking this fusible square interfacing fabric. Makes putting together small squares so much fun. The squares end up being an 1 1/2”, which is really nice size.. I hope to have this done by the end of the month I don’t know why not…..
The binding here on this quilt I just used the extra that I cut away from when it was finished quilt being quilted.
You always have some extra along the outside that the quilter likes to have so they can attach it to their machine. A lot of times I will cut that off and and just use it. I mean it’s good fabric. When this one is done it will go to my middle daughter and then I have two more that I need to just totally make because my stepmother never got around to working on them. I helped her cut them out so she had the pieces but she never got to make them before her passing.
It is now done, yeah….
The last thing I would like to share is an apron I just finished sewing together. It was a free pattern that I had seen on a podcast which was a couple years ago. I downloaded it and finally just got around to making it. I’m not sure if the pattern still available but I believe it is so here is the name of the brand and who put it out.
Just search Tessuti apron pattern if you wish to go and check it out yourself very simple.
Went together beautifully and easily, lot of detail to the instructions so someone who doesn’t sew clothing could easily follow this and be able to make themself an apron.
Thank you, that’s about it I believe so until next time take care and enjoy the spring if you’re in the northern hemisphere and fall for you southern hemispheres.


Glad to see you've been able to get back to stitching. You've made good progress on a lot of fronts. Hope you've been able to enjoy the spring weather. Happy Mother's Day!
ReplyDelete