Time to de-clutter the Studio

It's long over due, that is to de-clutter and organize my studio.


My room is a spare bedroom, 12 x 10 and I have 2 very nice windows which give me plenty of natural light. Very lucky in so many ways. Sure have come a long way from sewing on the coffee table back in the 70's.

In the room I have all my sewing stuff except the fabric. I hate to admit it but I have way too much fabric and that is something I need to go through..... but that's for another time. Right now I'll focus just on the studio.

In the room I also have my fiber/yarn and other needlework tools.

Well I can explain more as I go along.
I will start with some pictures I took when I decided to go with this endeavor.

So here are the before picture


This cubical has in the boxes a variety of crafting stuff. From sewing to natural dyeing materials. There are also patterns and a whole bunch of worthless stuff. This will all be gone through.
Along with the cart next to it.

Over to the right of the cubical is the next 2 pictures.
First one is the upper half of the same area of the second picture.


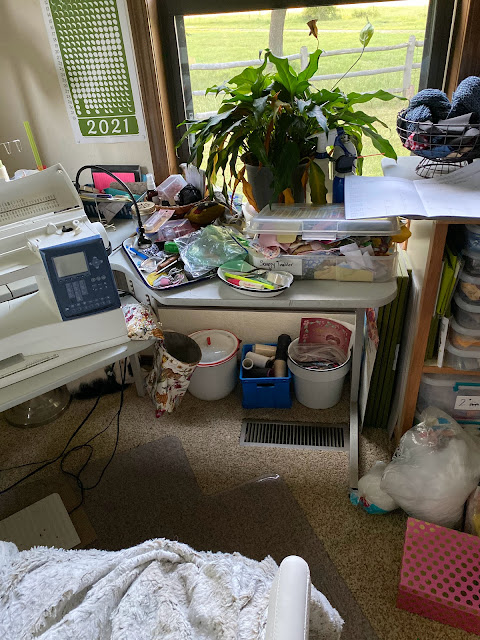
In this part of the room is what you see when you first look into the room. So very messy and clutter.

The cabinet holds most of the yarn I have, except for the acrylic, it's out in the garage too.
The boxes on top of the cabinet are my quilt WIP's. I love those boxes but Ikea stopped selling them. Bummer because they work so well in this room.

My sit down longarm,  which has become a table to put extra stuff on, is something I have to figure out an alternative solution.
I need to have that space to be able to get to the quilting I have.
Also on the floor is my e-spinner and thread for weaving.
Have some ideas on how to deal with them. 


As you keep turning to the right is my sewing area.

I use an old corner computer table for my sewing table. Works pretty well and that stays...... its all the other clutter that needs to find a new home.


I love my plants and I do have good light for them but I'm not sure what I will do about them yet. The hanging plants will stay thou.

I've order a cabinet with drawers to go under the table. That is one thing I do not have n this room and that is drawers.

It came this past week and I had started putting it together.


It will go in this space here above. Again as you can see any space free becomes a catch all for projects. Also on the table is sewing stuff that will go in the drawers.


This is my pressing table with some nice storage area.
Here and the cutting table have the open shelfs and I plan on making curtains to hide this busyness. I find it overwhelming to look at.
I found this fabric at goodwill for a few dollars, great deal.


I'm hoping it looks as good as it does in my head.


This is the cutting table's shelfs.
Behind the cutting table is the design wall.

We have now made a complete tour of the room.

I think I will end this post here and continue with what I do in the next one or two future posts.

When I get the drawers done I can show some genuine progress.


I do have a little progress to show on the Spring Fling quilt. Have one more block to complete than I can start on all the pieces for the setting.


This is the setting design.


Till next time


Comments

  1. I don't have a room for crafting, and all of my supplies were in my bedroom walk-in closet. I have been moving the yarn upstairs on shelves now, and purging any craft supplies I haven't used in the past 14 years. I have donated much lately, and it feels good to get organized. Your space looks lovely for all sorts of crafting.

    ReplyDelete
  2. Looks a lot like my sunroom sewing closet! ---"Love"

    ReplyDelete
  3. Good luck with the decluttering. I really need to do that too, but sewing is so much more fun.

    ReplyDelete
  4. Goodluck on the decluttering.....I need to do this also.......

    ReplyDelete

Post a Comment

Welcome friends to share a thought, I enjoy reading them and will try my best to reply back by email most of the time. But if you do not hear back it's because you are a no-reply blogger.

Popular posts from this blog

How to Make a Portable Design Wall

I had wanted to get a portable design wall to take to retreats but did not want to pay the price. Looked at various pins on pinterest and took ideas from more than one to come up with my verison. It worked out great and only cost a fraction of the price. The PVC pipes, joints and 2 yards of felt cost under $22.00 My design wall is 4' x 4' which stands approximately 5 1/5' tall. For this size need 2 - 10ft length of 3/4" PVC pipe for the frame and 4ft of 1" PVC pipe for the feet Cut the 3/4" PVC into 4 - 4' section                                                                                       2 - 1' section              Cut the 1"  PVC into 4 - 1' section          The joints you'll need will be 2 - 3/4" elbows 2 - 3/4" T's 2 - 3/4" to 1" T (this will be the base of the Feet) 4 - 1" elbow Also need pipe cutters (this cost me almost as much

Yarn Along 2/20/13 Spoon Pin Doily

It's snowing here and I know some of you are tired of snow but here we will take the moisture any way we can get it. Plus it just gives me a reason to stay in and work on some of my projects. In this picture I'm not sure if you can make it out but in the background there are some wild turkeys that hang around the house sometime, just  chilling This project I'm working on is Spool Pin Doilies.   I had never heard of them before until Bonnie Hunter had mentioned it on her blog . She a had a viewer send her one for her sewing machine along with a pattern. I did not like the pattern but loved the idea so I decided to make up my own version. I wanted a more simple, smaller and fuller doily. So I tried different thread sizes to get one that I like. (From left to right) I tried sock yarn, which I'll redo because I think I like that look. Heavy weight crochet thread, nope too big Bamboo yarn, I like it. Looks good on my Kenmore. Pearl cott

What's Up

Well that is a big question, what's up Seeing how I haven't posted since before the retreat I went to. So I will show what I did at the retreat and what I have been doing these past few days, which is this Log Cabin Christmas Tree  wall hanging I have the blocks completed and now it just a matter of getting them sewn together. I'll get to that tomorrow. While at the retreat I made this baby quilt top with the disappearing 4-patch block. I had a charm pack and used some "snow" fabric Kaufman snow is one of my favorite whites to use. It's white but not a stark, bright white, goes well with a majority of the fabric I've collected. I started late making my blocks for RCS14 First I wasn't sure what pattern I wanted to make and then with all that was going on the first part of the year, I didn't start until July. One quilt is using a quarter log cabin in solid colors. I made these at the retreat, have the other half t