
How to Make a Cool Car Trash Bag

This is my trash bag but it was not an original ideal, I saw it over at Meridian Road  awhile back and realize that this was something I needed bad. You see I am notorious for throwing my trash into the back and would forget about it. Now that I have my new car and not the farm truck, I wanted to get out of that habit. What made this bag stand out for me was the fact that you can seal the bag shut so trash won't fall out and will keep the smell in and not in your car.


Doesn't it look sharp, now the one I saw was made from an old money bag, I do not have an old money bag but I thought this ticking fabric would look good. Very easy to make and I'll share how I did mine, you can also see how she made her at her blog too.


Start with a large Zip Lock bag and cut out 2 pieces of fabric about a 1/4 - 1/2 inch longer around the sides and about 1 1/2 inch at the top.

 Sew the side seams, I had a fold on the bottom so I didn't need to sew the bottom but if you did not have a fold on bottom sew that seam also.


Fold twice the top edge about 1/2 wide. Gives it a nice clean look.
You will top stitch it at the bottom edge of fold.

It should look like this.

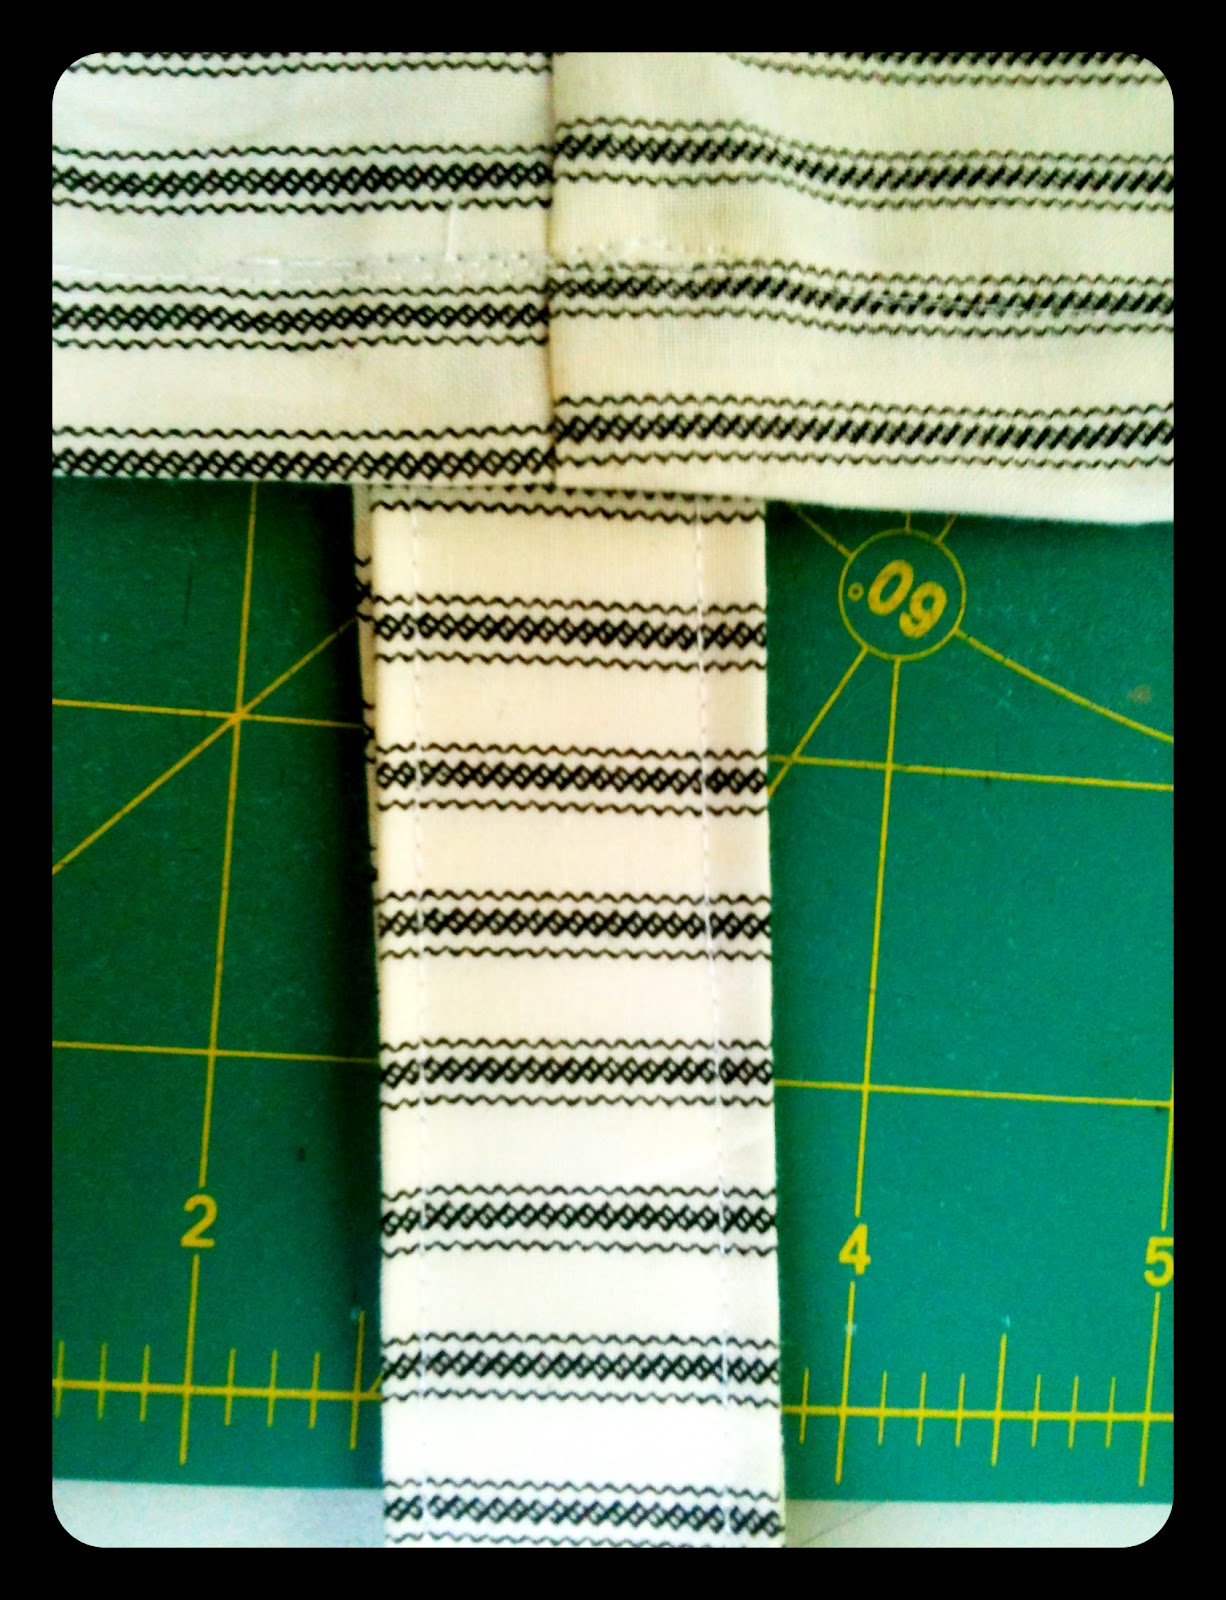
You will need to cut a piece for the loop for the bag to hang, now  I cut  a piece of fabric that is 16 x 4 1/2 inches. The bag I saw had a medal ring to use for attaching. 

Fold in half and press.

You will fold in half again each side and press.

Will look like this.

Now you need to press a small fold on each end.

voila

Now top stitch on each side, I did it about 1/8 inch from edge.

Fold the strip in half and attach at one side.

Now it's time to insert the bag. Just slip it in there as far as it goes and you will sew around the top of bag

Like so

It will look like this, and you are ready to go.

Again VOILA

Till Next Time
Kat
=^..^=


Comments

Post a Comment

Welcome friends to share a thought, I enjoy reading them and will try my best to reply back by email most of the time. But if you do not hear back it's because you are a no-reply blogger.

Popular posts from this blog

Countdown to Autumn. 18 days

  After some thought I came up with a general "get to" list for a pre - Autumn preparation. I had mentioned a couple in the last post. I will keep those and have added a few more. I needed to remind myself that a lot of my ideas are a little premature hance the pre autumn and will be better done next month. So here is what I came up with... Deep cleaning is still on Planning activity for next month Decorating inside and out.   Making a fall outfit, sewing and knitting Find some new recipes to try Make a pair of fall or Halloween socks I will be focus on journaling with Autumn being the present subject.  Making sourdough bread again This one I have already started, Watching a cozy, feel good show. So "the man of the place" and are rewatching PBS All Creatures Great and Small. In a matter of a couple days we have watched season 1. I figure we need to refrain ourselves and keep it down to a couple episodes a night. Today I put a binding on another quilt from the pile. ...

Fun Time with Dots

Welcome to my blog, I hope you can take a moment to check out my blog. Here you will find that I like to share a lot of what happens on my farm here in NE Oklahoma. You get a little of life with cows and chickens, my struggles with growing an organic vegetable garden, canning, cooking and my love for quilting, knitting and most anything that has needlework involved. Plus some.... I love the fact that I can join in on such a fun hop. Thanks goes to our cheerleader Corrie from   Quilt Taffy   She will have the schedule to the entire blog hop. And special thanks to M adame Samm from  Sew WE Quilt for setting this up.  I am sharing my day with these wonderful bloggers Why Knot Kwilt  Stitchin by the Lake Beth @ Plum and June The Recipe Bunny Sunshine Girl Aunt Marti The Fuzzy Hat Quilter Cliodana Now all the formality done, lets get on with what you came for,  a fun project w...

How to Make a Portable Design Wall

I had wanted to get a portable design wall to take to retreats but did not want to pay the price. Looked at various pins on pinterest and took ideas from more than one to come up with my verison. It worked out great and only cost a fraction of the price. The PVC pipes, joints and 2 yards of felt cost under $22.00 My design wall is 4' x 4' which stands approximately 5 1/5' tall. For this size need 2 - 10ft length of 3/4" PVC pipe for the frame and 4ft of 1" PVC pipe for the feet Cut the 3/4" PVC into 4 - 4' section                                                                                       2 - 1' section              Cut the 1"  PVC into 4 - 1' section        ...