The title says it all, this weekend has been a blessing of what's to come. We have had two days of some perfect fall weather. I just want to sit out on the back porch and read, enjoy the weather. But I think instead of reading I'm going to take Ben's I spy quilt and try to finish up the binding.

I've been meaning for a while now to write this post on how the boys I Spy quilts came about and was constructed. It started with Audrey over at Quilty Folks and her Quilty 365 challenge.
I decided then, when I saw the challenge, that this is going to be the boys I Spy quilt. Because you see I've been collecting and thinking about how I was going to go about making that quilt and when I saw her post and challenge, I knew that was what I wanted to do.

Now knowing that I had 2 quilts I was going to be making and realized it wasn't feasible for me to appliqué the circle down by hand. So I decided to use the method where you sew fusible interfacing to the circle and then iron it onto the background. Then either go about stitching it down to the background fabric either with a topstitch or the way I ended up doing it when quilting the circle. Figured that was a great way of doing two things that needed to be done at one time.

Over at my post here I describe how I went about making the circles to apply them to the background. I found it an easy method, an efficient method and one that I could do fast seeing how I was going to end up making 442 circles.
I had a lot of fun choosing and fussy cutting the motif for the circles.
I unquestionably was not lacking fabric. I have come to realize I have a bad addiction to fabric and seeing how I had ample supply of novelty prints, I was able to not have any duplicates of circles on the same quilt. I did make two of the same motif but that was to have one in Ben's quilt and one in Blake's quilt.
So the boys quilts ended up with 221 circles... each on a 5 1/2 inch finished square with the quilt ended up measured out to be 70 x 91.5. Perfect twin sized quilt.
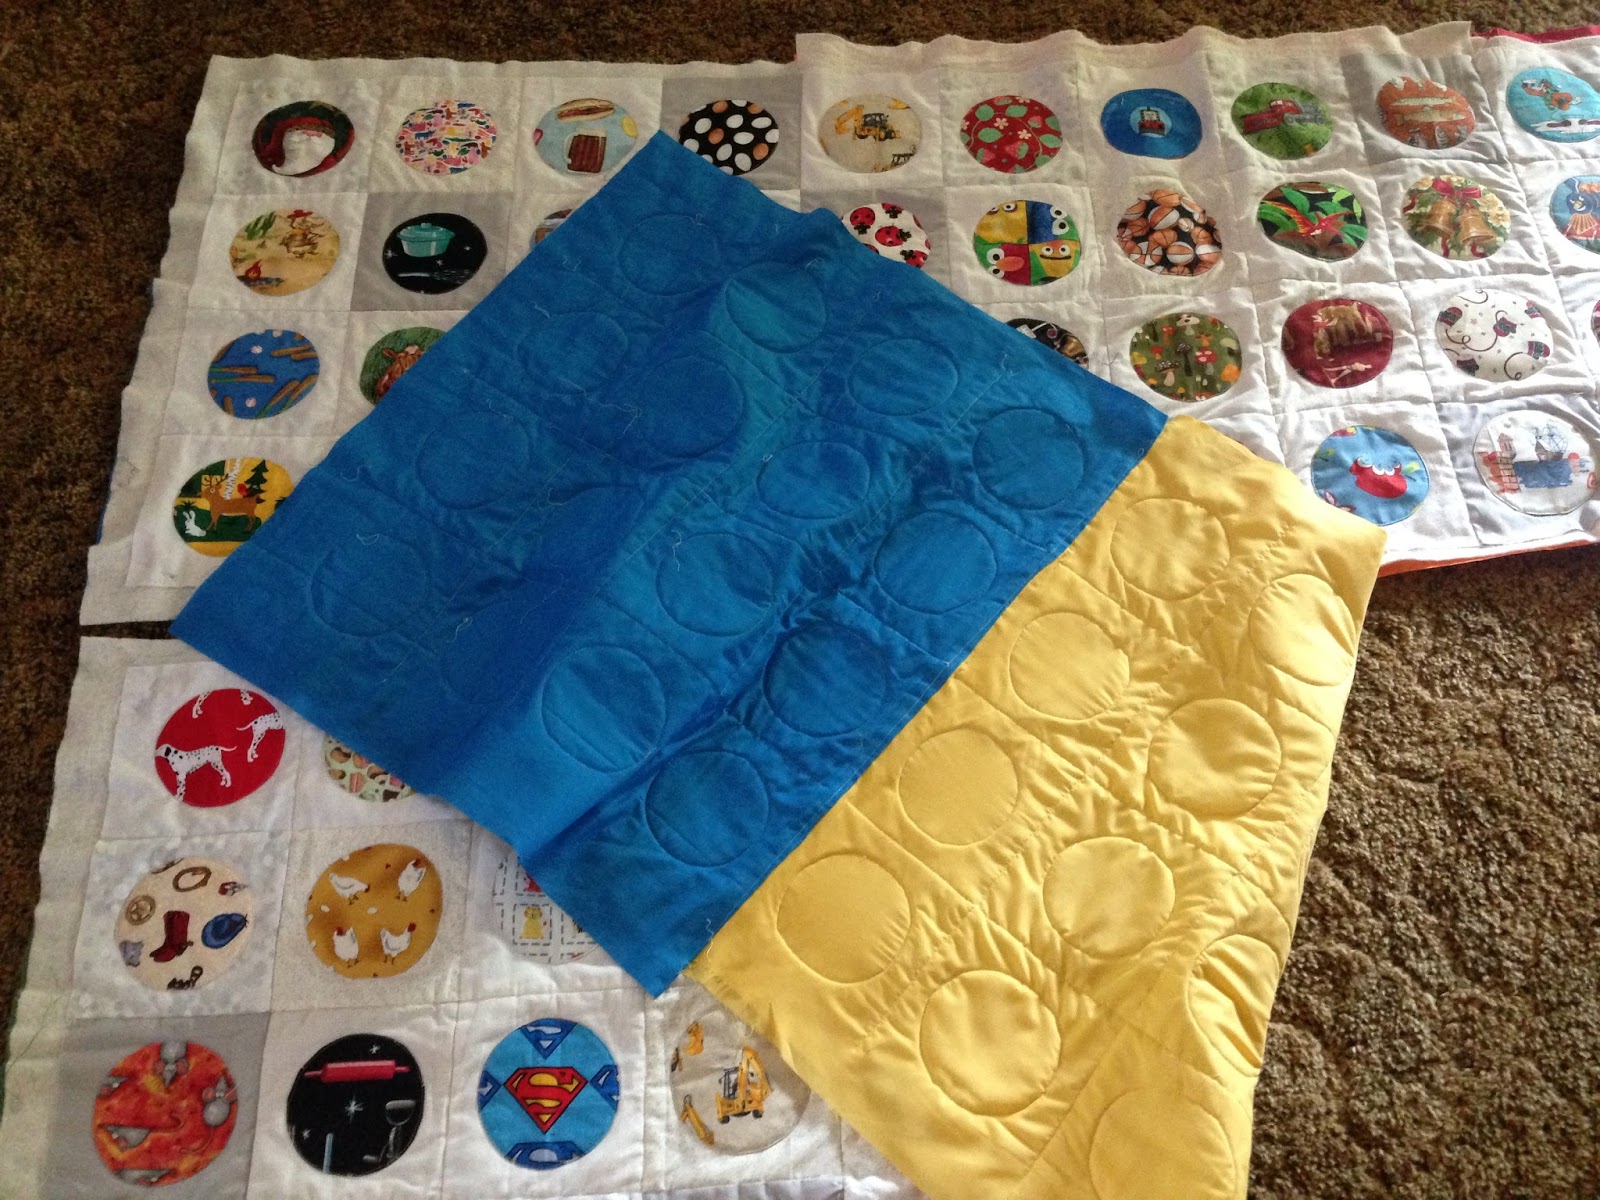
Now I tried something new which I haven't done before and that was to quilt as you go. I did research online, watched a few YouTube videos, (with Jen Kingwell) read a few blogs and articles. You can assemble the section with sashings or not. I chose this method without because I did not want to have Sashing strips in my quilts.

So what I did was sandwich the front, backing and the batting then went ahead and

machine quilted the circles,

then stitched in the ditch of each one of the background squares.

I started with Blake's first which was divided into 12 sections.

Thought that would be a good size to manipulate on my domestic machine.

For the back are various solids of the primary colors to make it bright and cheery...... childlike. I can say that after putting Blake's together I realized I could get away with making the sections larger in Ben's quilt so his has only six sections because I found putting the quilted sections together was actually a little more challenging than the quilting part.
Or it might have been because I had unwanted help from Pete.

Now maybe it wouldn't of been that way if I had used sashing, I don't know.

The challenge was to make the back be in the same position as the front where I was going to be doing the stitching in the ditch on the top. I wished all of the section lined up this well.


As you can see from the pictures I did not always lined it up correctly. I will and have gone back and did a little whip stitching in spots where it didn't catch at all or just didn't like how much of the edge with flapping. But I have to say after it's all done I really enjoyed the process. I know these were my first attempt and nothing's perfect on your first attempt and I can live with that. These are to be usable quilts and want the boys to enjoy them. They are not show quality quilts. And to be honest nobody will really noticed it other than myself.

So now I can say I'm prematurely early on finishing my Quilty 365 challenge.

The boys have already used them even though the binding wasn't on when they were here last month.

But they will be on the bed waiting for them when they come for Christmas.
Thank you for taking time to read this lengthy post.

Linking up with Kathy's Quilt
These quilts look amazing!!
ReplyDeleteThank you, very kind of you.
DeleteHow incredibly fun are those quilts!! They are amazingly bright and cheerful and with all those things to spy, the lucky receipients will have hours of fun trying to spot everything that is going on!! Thanks for sharing!!
ReplyDeleteYou are so right, when they were here they were playing I Spy. I loved it.
DeleteYour quilt is amazing! I love all those I spy circles. Thanks for sharing with Oh Scrap!
ReplyDeleteI used interfacting on some clam shells sure speeds things up. Great pattern for an I spy quilt I bet the boys will really enjoy them
ReplyDeleteI never thought about clam shell. I'll have to try that. Thank you for the tip
DeleteCongratulations on these beautiful finishes and it was fascinating to me because I thought that you always had to have sashing for the as you go method...I am going to check out that video link, thank you! :)
ReplyDeleteI was like you and thought had to have sashing. But when I saw Jen Kingwell video the light bulb turned on. Now I realize she was hand quilting but why not on the machine. I have to admit I want to try with hand quilting to
DeleteHow FUN these quilts are!! I am willing to bet they will be WELL loved! What a snuggly treat!! :)
ReplyDeleteThat's an awesome way to do an iSpy! And I certainly had fun, because I think I have a dress that uses that very same Superman "S" fabric. Ha! Excellent job!
ReplyDeleteCongratulations - that's an impressive finish already! I've never tried quilt as you go, or making applique circles that way, thanks for sharing your experience. The quilts look fab and I bet the boys will love them. I have to say I think Pete looks like he's in charge there!!!
ReplyDeleteCongratulations on finishing your circles. They look so good on the beds and are sure to be treasured.
ReplyDeleteI barely started the Quilty 365 and am loving it! After seeing your I Spy Quilty 365, I know I will be making another one or two (I have four grandbabies - so far....) Awesome and fun quilts!
ReplyDeleteSimply fabulous! What an amazing group of novelty fabrics you had for these quilts!
ReplyDeleteWhat a great, great finish for you! I love that those little boys get to enjoy these quilts!
ReplyDeleteThis was very interesting for me to read. I too make quilt as you go for the first time. But I think I would become very nervous to do this with the machine. So kudos to you. I do hand appliqué for the circles and hand sewing on the back no sashing. Unfortunately I missed the linky party at Audreys this time. But I just started my 12. month. So nearly done.
ReplyDelete