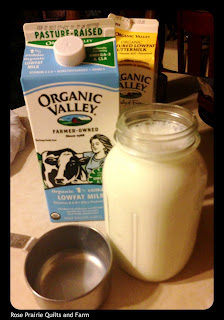
Have you ever try making your own cultured buttermilk?
Once I had read about how it was done, I knew I just had to give it a shot. I use a lot of buttermilk in my cooking and baking and one of the things I like about it is the long shelf life it has for a dairy item.
The way I did mine was to use some buttermilk that I had purchased at the store. I believe I read that there are powdered culture that can be used but it was easier for me this way.
STEP 1.
Need to start with a clean and sterilized jar.
I used a quart size.
STEP 2.
Start with fresh milk and cultured buttermilk. The fresher the better. If your buttermilk is older than 3 weeks it might not have enough active bacteria to give the results needed. I used 1% milk but that is because I wanted just a little fat in my milk. Gives it a little richer flavor but you can use skim if you want.
STEP 3.
 Add a bacterial starter of 6 to 8 ounces of active fresh cultured buttermilk to a clean quart jar. Use 6 ounces if you are certain of the freshness of the starter (a ratio of about 1 part starter plus 4 parts milk). When in doubt, use a full cup of buttermilk as starter (a ratio of 1 part starter plus 3 parts milk). I did a cup of buttermilk and 3 cups of milk. Screw on the lid tightly & shake to mix thoroughly
It needs a warm place for for the milk to clabber. It should take about 24 hours and maybe up to 36 but no more than that. If it does, the starter was no longer active. I had read that the milk could still be used in baking. I put mine near our wood stove.
Was good in 24 hours.
To tell if it is ready is to pour some in a glass, the thickened buttermilk coats the glass. The finished buttermilk should be refrigerated. It keeps easily for weeks.
There you go, it's that easy.


I love buttermilk biscuits made from scratch, although honestly, I can't tell you the last time I made them! Your post reminded me of my mom doing this when my sisters and I were little. She made some great desserts with the fresh milk, cream, butter, etc.
ReplyDeleteKat, I am so grateful that you've shared this recipe today. I had exactly 8 ounces of buttermilk left (same brand that you use) and paused after reading your entry long enough to go start a new jar. Can't wait to see how it turns out!
ReplyDeleteI wanted to invite you to join my How To Tuesday link party, if you haven't already joined . It would be wonderful to have you!
http://housewifehowtos.com/linkage/link-party-2/how-to-tuesday-link-party-12-and-features/
I make mine the same way. I use AnnaBelle's milk (our Jersey) though with the store bought cultured buttermilk to get it started then I just keep it going as needed.
ReplyDeleteThanks for sharing ;-)
Amanda
Matthew 6:33
This is amazing, thank you so much for sharing, I will definitely be making this soon!
ReplyDeleteThank you so much for linking up on Tutorial Thursdays over the last week.
Congrats - This was my favourite link from the collection, and as such I will be featuring you tomorrow in this weeks Linky Party!
I do hope you will be joining in this week again :)
x
Natalie
www.marigoldsloft.blogspot.com